Showing posts with label Handmade. Show all posts

Monday, March 11, 2013

"I Made That!" Monday: Vintage Inspired Girls Dress


With Spring coming and two little ladies who prefer dresses to anything else, I was excited to find several different fabrics that have a very vintage look to them. They were also super inexpensive, so I may have gone a bit crazy. I'm okay with that though.

Have a lovely day!


Wednesday, February 13, 2013

LOVE is: Tiny Gold-rimmed Bowls


I love pottery. I love gold. When I first saw The Object Enthusiast at a local market here, I fell in love with the pottery of Emily Reinhardt. Then I told her over and over how much I loved her work, to the point that she probably began feeling uncomfortable, and then I just stared at it all for several minutes. 

It's all just so beautiful.

And me, being the Romantic that I am, love every single aspect of a hard lump of clay molded into something that I can't take my eyes off of.


Friday, December 14, 2012

The Daily DIY: Hanging Paper Lanterns


These Hanging Paper Lanterns are SUPER easy to make and are so pretty to look at.
Here's a short video tutorial to show just HOW easy.


music: "Oh Holiday" by Jules Larson

I used a translucent thread to hang these from our ceiling. You could also set these over mason jars with tea lights to create an actual lantern effect. I'm excited to incorporate these into the little ladies room decor... as they are much like me and enjoy having pretty things to look at all around them. 

Have a lovely, wonderful weekend!


Monday, November 5, 2012

"I Made That!" Monday: Stuffed Monkey


A tiny, little lady in my life turns two today. We celebrated with her over the weekend and this was her gift. She's into Curious George right now, and she's quite the monkey herself, so I felt like she needed her own little pink monkey. After opening gifts, she carried her monkey and her little Princess Aurora baby around everywhere she went, so I think it was a hit.

PS: Making stuffed animals is a task... don't let anyone try to tell you otherwise.

Have a lovely day!

Monday, October 29, 2012

"I Made That!" Monday: The Softest Baby Bed on Earth


Potato Soup in Bread Bowls and a creamy Pudding dessert specifically requested by Mommy... and it was delicious!

Each guest decorated a onesie for the baby.

My newest little Love will be making it's debut in a month or so, and it was time to celebrate! My brother and his wife were not planning on finding out the gender of the baby until the birth, but she ended up needing to have a sonogram so the secret was tucked away in an envelope for them to open if they felt the need to do so. And there are a few of us who were a bit excited about this, and even more once it was revealed at the shower that IT's a SHE! I'd have been just as excited for a little boy baby as well, but now I know just exactly the kinds of things to be stocking up on for Baby.

For one of the shower gifts, several of us chipped in for a little basket and bedding. I had planned on making a quilt, but then I found the SOFTEST fabric on Earth and decided to go another route. My sister had told me they were decorating with a blue and brown palette, so when the softest fabric on Earth was also the perfect color it was purchased and was a complete win-win situation.


I'm very excited for this little lady to get here and to see what she adds to the mix as she will be the FOURTH female added to my brother's world... hahahaha oh, I love it so much. And him. 
{He is an INCREDIBLE dad... it makes me tear up just writing that because he seriously is just such a great dad.} She will definitely be loved so much.


Monday, July 30, 2012

"I Made That Monday!": A Productive Week


I found myself in project mode last week.

Two pillowcase dresses for two little ladies.
These are not actually pillowcases, but SO simple to create.
I have STACKS of fabric pleading to become
the wears of the tiny fashionistas around here.
I may even get really crazy and make myself one.

A leather flower.
Oooh, this has been a dream in my mind since I began creating these hair pins,
and I have to say that this one is my favorite yet.
That mustard color and those white vintage gems together make me smile...
every time I look at it.

Arm Candy.
I had seen a wrap bracelet in a local shop here and SWOONED over it.
It was so incredibly beautiful.
It was also $40.
I could not spend $40 on a bracelet.
Fortunately, a few weeks later,
some fellow crafters and I worked our magic little fingers to the bone
to create our own.
I BEGAN the bracelet one evening,
worked on it for a good hour and a half to two hours,
and finished it a few days later after spending at least another two hours on it
(Granted, I am a perfectionist.).
That wrap bracelet I saw in the local shop here...
worth every single penny.

Custom Canvas Art.
This is so simple, 
and such an easy way to create words throughout your home.
I had originally seen it done here,
and then began seeing it all over Pinterest.
The original one I saw is actually a Paint-By-Number painting picked up at a thrift shop,
with Vinyl lettering placed together to make the quote and then painted white.
Mine is actually a canvas,
painted with colors that I chose,
Vinyl lettering over that to create the quote
and then spray painted with a glossy white paint.
Let the paint dry for the afternoon, or overnight,
and then peel away the letters.
My Love created a video of our life together put to the music of "Stand By Me";
this will hang in our room.
I may be going overboard with these soon.

Also, plans have begun for the 2012 Fall Red Barn Outdoor Market.
The musicians are lined up;
The food Vendors are tweeking menus;
and the Vendors are registering and preparing.
If you are local, come!
(and even if you're not... ahem... Becky! It's worth a little weekend trip.)
It is magical.

Get creative today!


Monday, July 16, 2012

"I Made That!" Monday: Rose Cabochon Pendants


Let me fill you all in on something...
Each morning I wake up to some crazy little munchkin people running into my room;
they cuddle and snuggle and jump and finally realize that they are ready for breakfast
and just start saying over and over, 
"I'm ready for breakfast, I'm ready for breakfast...".
So we're up and at em' pretty quick getting breakfasts made and bellies filled.
However,
in the time that they are cuddling and snuggling and jumping,
I am usually checking emails...
looking for one very special,
very exciting email...
each morning.

It's my daily deal from The Plaid Barn.
The Plaid Barn is a website that offers you an
AMAZING DEAL
on some kind of craft supply or DIY kit each day
at FRACTIONS of their normal costs...
seriously like up to 90% sometimes!
For someone who LOVES a deal
AND
has an addictive personality...
well, you can just imagine.

These were actually two different daily deals:
(which also came with an epoxy cover...
the girls and I have already made some Mod Podged pendants and used those...
and they are CUTE!)
and
the Tiny, Petite Rose Cabochons.

I saw these sitting together one day and decided they would combine
and be the perfect little afternoon project for me.
I painted a few of the pendants,
but loved the look of the wood for some of them.
Then I just glued the little cabochons on,
and the connector for the chain,
and voila!
And I still have some left over...
so some sisters may be getting some treats soon,
we'll see.

Be lovely today!!


Monday, June 18, 2012

"I Made That!" Monday: diy Summer Day Teepee


My littles are always looking for a cozy little place to hide away in,
and making some little teepee's has been on my never ending  project list for awhile.

I chose THE most simple way to do this
and used stuff that we already had,
so this was a great afternoon project.

You'll need:

Four sticks similar in height
(at whatever height you'd like the teepee to be)

A Full or Queen Size Sheet

Rope or Twine

Scissors 


Begin by setting the sticks up creating a pyramid;
then take the rope or twine and begin looping it through every other stick.
I reinforced it by looping it completely around one stick and 
then looping it a few times in the opposite direction as well.
Knot the two ends together a couple times.


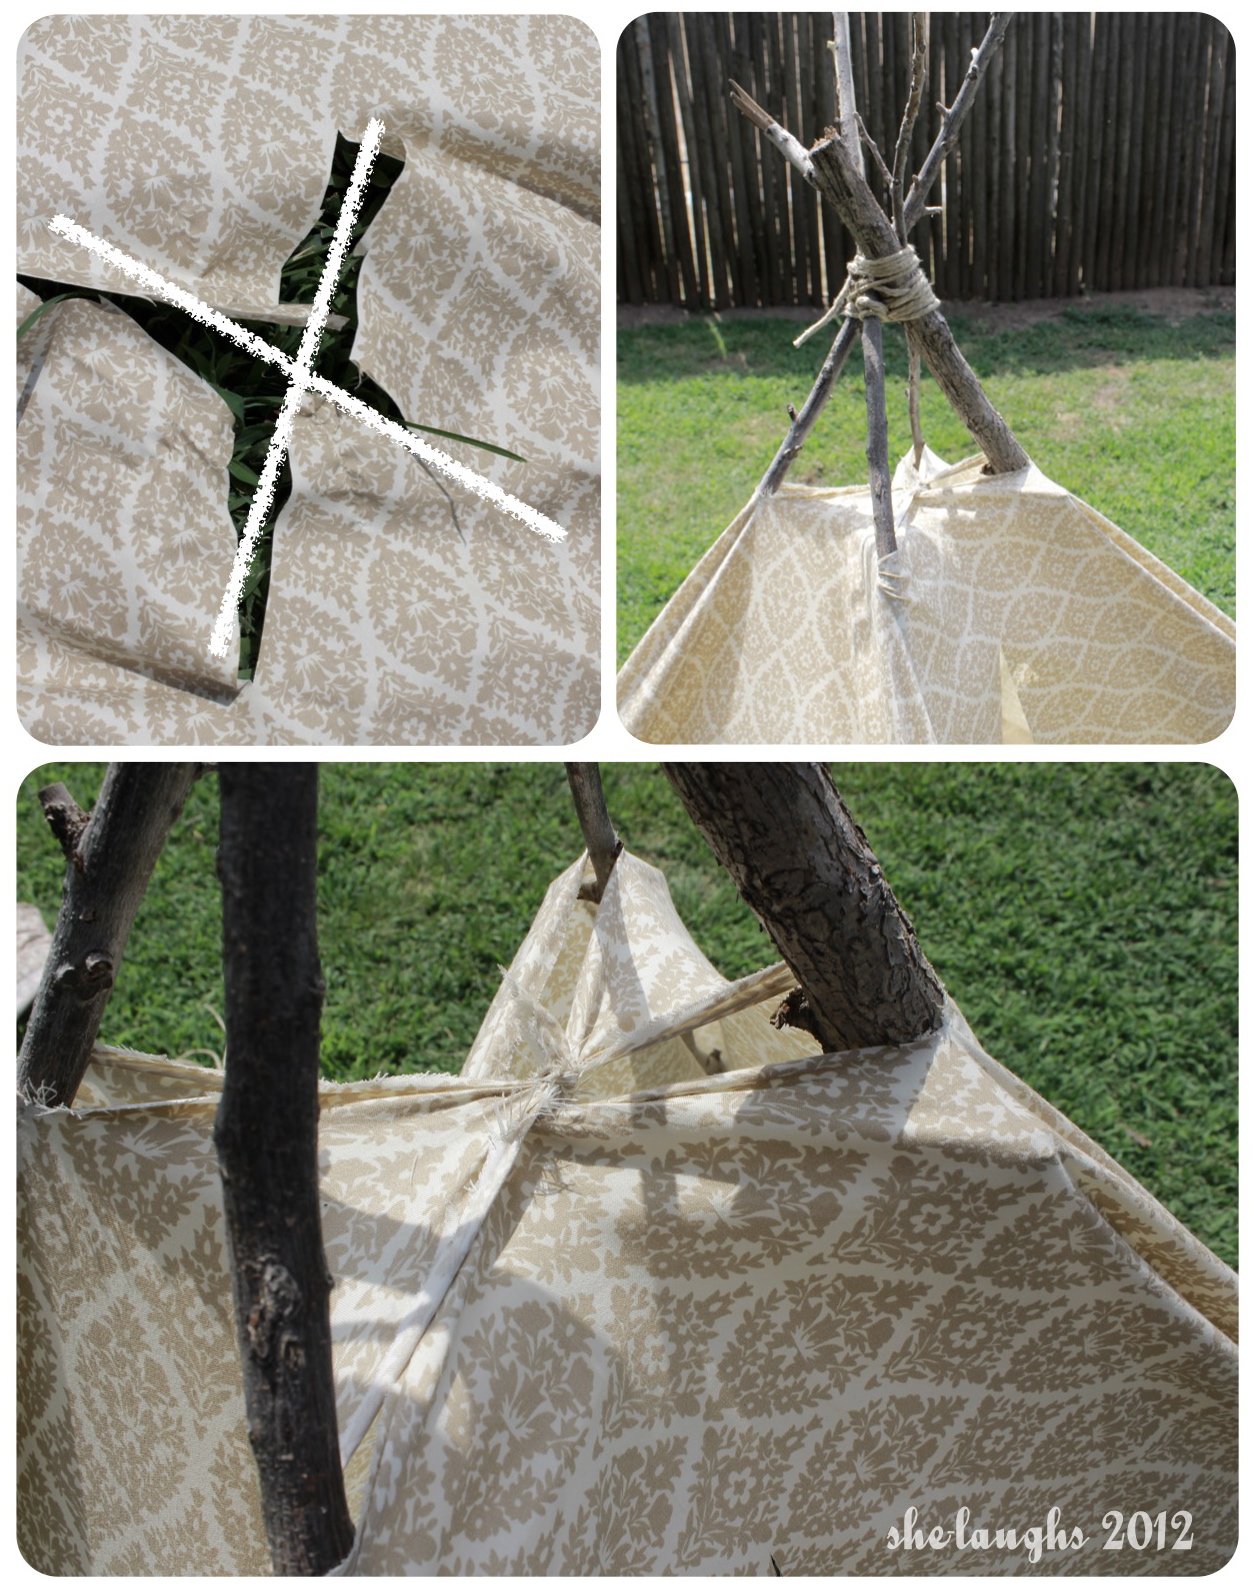
Cut an 'X' in the middle of the sheet
and then drape over the sticks,
pulling the sticks through the 'X'.

I tied each opposite triangle (from the 'X' cut through the middle) to each other 
to keep the sheet from slipping at the top,
and also knotted the ends to the bottom of each stick.


I cut a straight line up one of the sides for an entrance
and knotted the ends together to keep it open.

Add some blankets, pillows, and books
and you have the perfect little Summer day teepee.


Monday, April 16, 2012

"I Made That!" Monday: Bead Bunting


Bunting is EVERYWHERE these days...
and I love it!
This bead bunting is a simple way 
to add loveliness anywhere.

You'll need:
Any kind of THIN Twine
Large Beads 

I already had twine, but picked up my beads at 
Hobby Lobby in the Jewelry section
where they just so happened to 
be 50% off that day.
I love it when that happens.

1. Measure out the twine to the length of bunting you want.
(I had ten beads and measured out 15 feet of twine
so I was able to have a bead every foot and twine 
leftover to attach)
2. Find the spot on the twine where the first bead will go and tie a knot.
(I ending up tying two knots as the holes in the beads were a bit larger 
than just one knot)
3. Slip the twine through the bead and then tie another knot to secure.
4. Repeat this with each bead.

See? Simple.
And look how lovely!


And...


This was my Love's dinner last night
after our littles were nestled in bed;
after he constructed a shelf in our kitchen
next to the dishwasher which he installed Saturday;
after he chainsawed through some very thick 
wooden stumps that made their way home with me;
after he then bolted the wooden discs to wooden stakes
(lots of projects going on here, people!);
he's really so good to me.


Monday, April 2, 2012

"I Made That!" Monday: Girls Dress and Skirt

My girls want to wear dresses EVERY day.
The little one will settle for a skirt now and then.
Fine by me...
just another creative outlet!
The dress isn't really a DIY type project...
but the skirt is SUPER easy.
I'll be making more of these
so {if I remember} I'll document the process
for a cute little tutorial.

PS
I LOVE that fabric the dress is made out of;
the lace on the skirt... ah! I love it.

Wednesday, March 21, 2012

The Daily DIY: Bird's Nest Pendant

I saw this on a blog the other night and pinned it right away
knowing that the little ladies and I would love this project
(since that first sighting, I'm seeing them everywhere now!).
It's pretty simple and takes less than 30 minutes to make...
even with little helpers wanting to do everything themselves.

Here's what you'll need:

Jewelry wire (ours is Vintage natural brass)
Beads (whatever color you'd like your eggs to be)

Note:
I kept the wire attached to the spindle and began in the middle
since I had no idea how much wire I would need.
I would suggest a length of 24 to 36 inches.

Begin by sticking your wire through one bead and wrapping through once more;
do this again with each bead.
Once wrapped through, stick the wire through all three beads forming a triangle.
From here, wrap the wire around and in and out of the beads
beginning to form a little nest.

From here, take one side of the wire and form a loop 
and then secure by wrapping around the formed nest and twisting several times.
Continue wrapping in and out of the nest;
secure end piece by wrapping or twisting.

And TADA! 
The end results should look something like this.
We have some pretty vintage fabric that we're going make a 
little necklace out of.

A perfect little accessory for Spring!

Tuesday, March 13, 2012

Shimmer and Lace

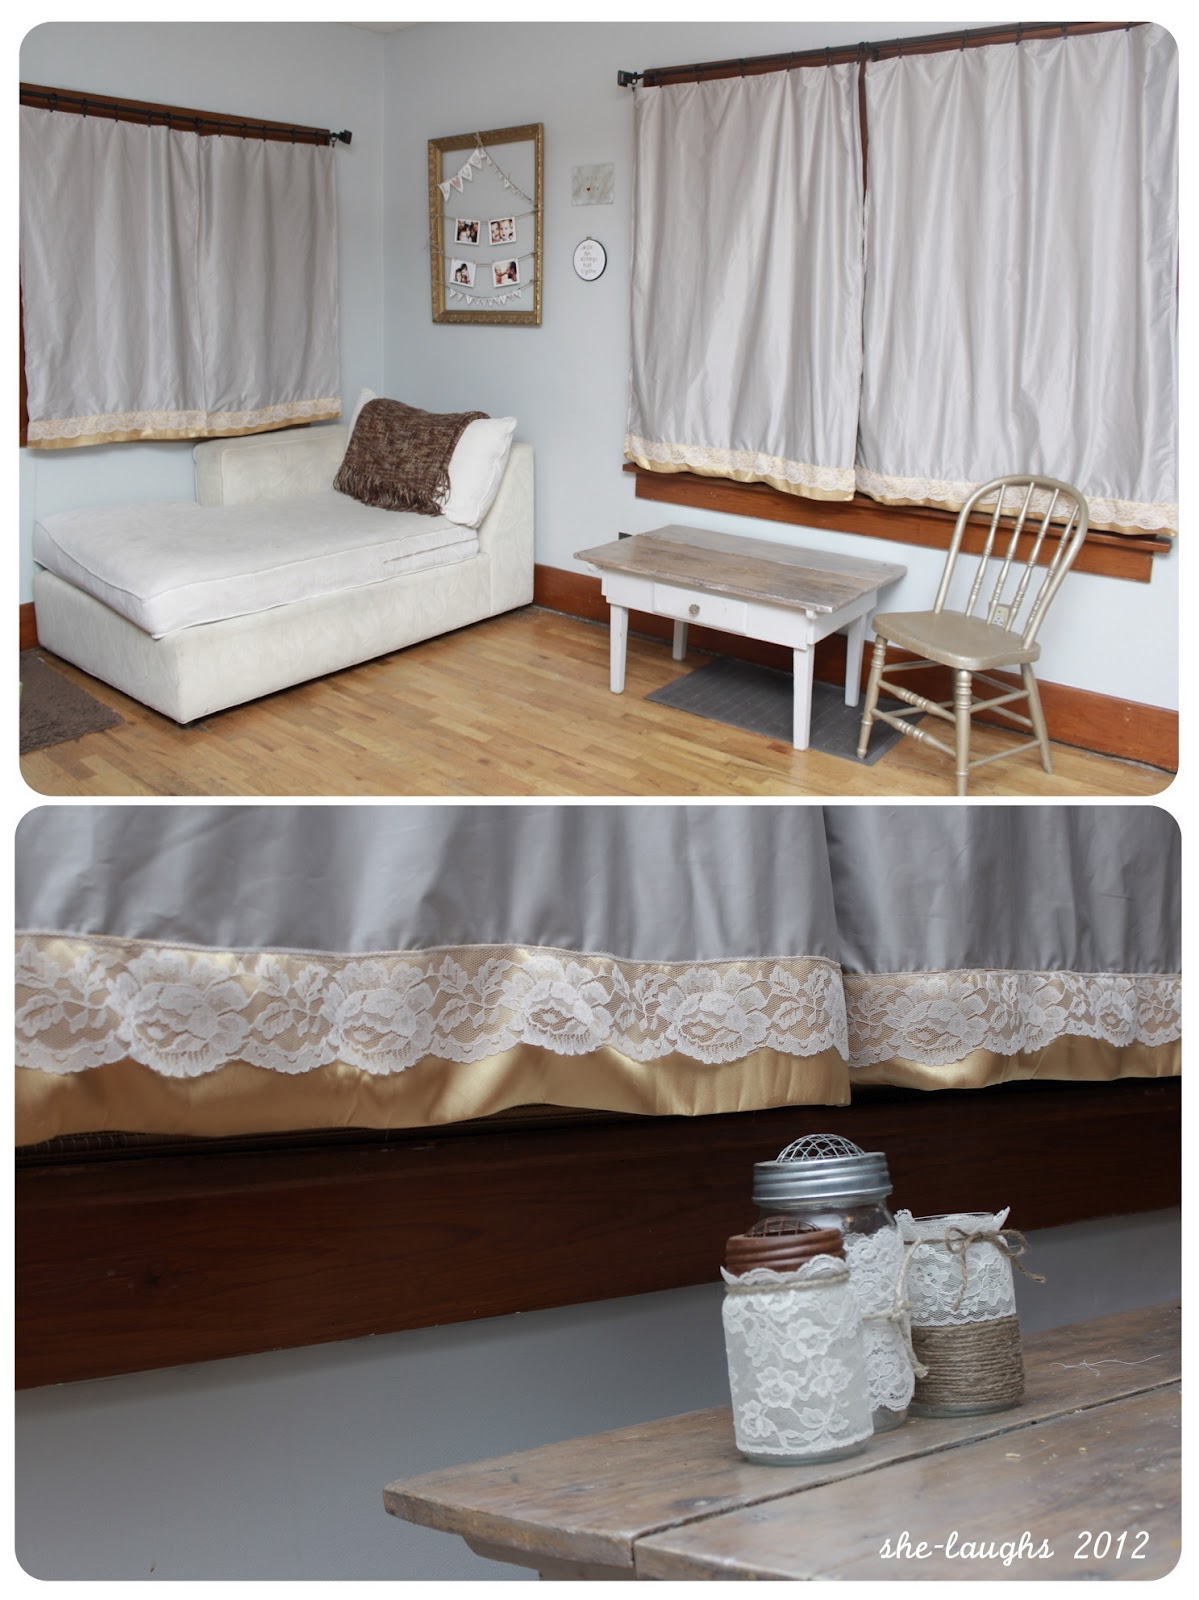
The curtains...
ooooooh, the curtains!
These turned out even better than I had dreamed them in my head!
And I always love it when that happens.

So, if you hadn't noticed from some of my other decor,
I'm bringing gold back.
I love the look of it and
the contrast of the silver and gold together
with the lace,
oh, goodness,
it makes me swoon.
It's so romantic.

When I had originally painted the room,
I was planning on keeping the blue curtains we had
but dying them a grayish kind of hue.
Then I had the idea to go for a dark, dark brown.
Long story short... they ended up a disturbing shade of purple.
So, when I just happen to stumble upon the silver fabric
for $1.50 a yard,
I took that as a sign that I was supposed to enhance our space with it.
The lace was around $2;
the gold fabric was on sale (later found at a different store)
for around $5;
and the backing was around $8
(with my 50% coupon to Joanne's... thanks Jess!).
That's $21, people...
for four custom panels.
I LOVE IT!

What's your take on gold these days??

Friday, March 9, 2012

Lace Fever

First...
A little sneak peek at what I've been working on this week.
If you can be in love with a curtain,
I am.

A few weeks ago,
some lady friends and I were working on these:


It's a jar
wrapped in lace and twine.
Seriously.
Find a jar,
get some lace,
hot glue the ends together,
and wrap some twine around it.
It can't get any easier
or more lovely.

They just add prettiness to the room.
I find myself wanting to don a petticoat and parasol
when I see them.
THAT'S how pretty they are.

Have a very lovely weekend!

Tuesday, March 6, 2012

I Wear My Heart On My Sweater

This suits my fancy a bit more.

I told you I was loving all these hearts I was seeing!
And I needed one.

I bought this sweater for $1.50 at my favorite thrift shop.
I already had the felt and thread, 
so this was one of my less expensive projects 
(You're welcome, Love).

All you need to do is cut your heart out;
pin it to the spot where you'd like it to be and then sew it on.
Pretty easy...
I ended up cutting the collar off 
(I used a zig-zag stitch to keep it from fraying)
because I felt claustrophobic in it...
well, and I like ribbons.
I just wove a little white ribbon through the knitting
to keep the neck a little more secure.

We'll see where this leads,
because now I have all kinds of ideas for patches.

Tuesday, February 21, 2012

One Wall Down...


Sure, it may be the smallest space of wall to cover
in our home...
but it's complete!
To some of you, 
this may seem like small potatoes...
however, it is a major feat in my book.

Here's a view of how it fits into the room:

See those curtains??
They're gettin' the boot!
Who knows when though... 
(I DO at least have all the materials needed to
make new ones;
it's just a matter of cutting, piecing, pinning, sewing...
you know, things that don't take much time at all.)
But, at some point...
I WILL CONQUER THEM!!!

Also,
I just would like to point something out:
see the shade of gray in the top picture
compared to the shade of gray in the bottom picture??
This drives me crazy.
Most of the time,
with the way the lighting is in our house,
it's the top shade of gray,
which I love.
There is a certain time of day
in which the light creates this
blueish-gray shade,
and I am not a fan.
I just needed to share that.

I have one other wall that is ALMOST complete.
It's been ALMOST complete for some weeks now.
It's just waiting for one more piece in order to
go from ALMOST complete
to officially complete,
but I just can't quite figure out what I'm wanting there...
it'll come to me, I'm sure.

What are some of your favorite pieces in your home??

Monday, January 30, 2012

And the Walls Sang!

Something in me burst on Friday
and sent me into 
PROJECT MODE FRENZY!
I started getting ideas like crazy...
and then ACTUALLY followed through on them
and begin decorating my house.

Over a year ago, 
we had placed our house on the market.
I completely de-personalized our home
in hopes that people would walk in and
visualize themselves cozied up in this little nest.
That did not happen.
We had quite a few interested lookers,
but no takers.

And then I just kept everything down,
because I had two crazy toddlers scurrying 
here and there throughout this small space.

And then I was pregnant...
and not much else went on in our home.

But now,
ooooooh!
I'm excited.
I envision things on the walls...
pieces of our lives
actually ON the walls for us to gaze upon.
It's thrilling.

And then I walked out to our shed
where everything has been stored.
Boxes upon boxes of treasures 
were calling out to me begging to be displayed
in all their glory once again.
It was like walking into your favorite
Antique shop and finding
everything you love
and then getting it all for free!

I must capitalize on this momentum!!!
So, for now, here are a few sneak peeks:


Haha!
Surely, you're on the edge of your seat
with a teaser like that!


Thursday, January 19, 2012

Old Faithful and The New Gal

Have I mentioned lately how much I love having sisters?
Let me just put this into perspective here:
I grew up with two younger brothers
and lived with my dad from 14 on.
Yeah, me and three boys.
I married the oldest of five boys...
five very BOYISH boys.
I love boys
(especially the snuggly little piece of roundness
who looks like a baby version of his daddy!).
I love brothers,
I mean LOVE them...
like I can tear up just thinking about 
HOW MUCH I love them kind of love.
But then sisters started coming along,
and a whole other world was before me.

I also REALLY love having my sisters on Pinterest.

So, a few months back I pinned this camera bag:

{via}

Isn't it so beautiful?

Yes, it is.
It's also $309.00...
slightly over what I'm willing to pay for a camera bag,
just slightly.
Oh my, but it IS beautiful.
I'd look at it every so often and just smile,
having come to terms that we would never be together.

And then it was my birthday.
At my in-laws house, we have birthday dinners
(birthday person gets to pick the meal, dessert, 
the birthday table cloth is put on the table,
everyone sings and it's a jolly good time)
and then we get to open our gift.

No one had asked for any suggestions this year
(which I was actually ecstatic about because I 
LOVE surprise gifts!)
so I was looking forward to seeing what they had come up with.
Oh mercy! They did not disappoint.


apparently searched high and low
and finally when the hopes of finding 
THE PERFECT MATCH
were almost gone,
my brother spotted this
(and it was on CLEARANCE!!).
My sister then MADE the form inside.
It is amazing.
AMAZING.

Check out her blog for the full tutorial.

The strap that came on it was just a tad thin
so I added Old Faithful,
who has been gracing my shoulder 
since my very first 35mm.

Aren't they such a lovely couple?


Wednesday, January 4, 2012

Gift Swap Treats

Remember the gift swap?
Well... I loved it...
and was introduced to some incredible creatives.


First up,
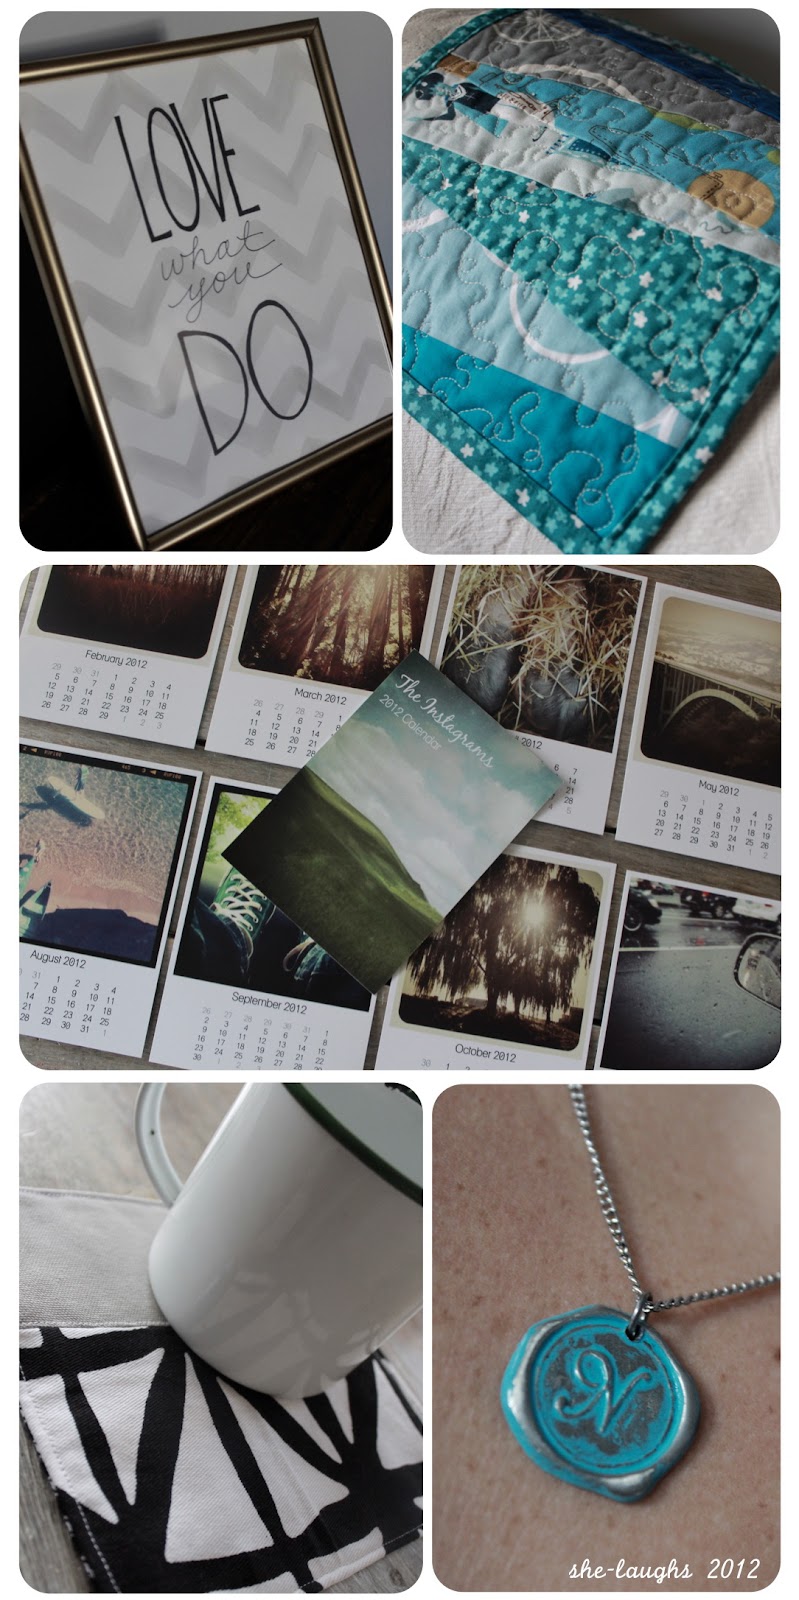
"Love what you do" print,
You can also find her here 
as she chronicles her 
adventures as a newlywed.

The colorful quilt was done by Jess Bridge,
jesssquilts@hotmail.com.

The Instagram Calendar,
by Marilyn over at Passionista Presents
(where you will find and sample some of the best taste in music!)
can be purchased here.

The mug rug is a 
moxiemandie original,
and can be purchased here;
but go check out all her amazing-ness at

And last, but certainly not least,
the wax seal necklace (um...awesome!) by
Brook aka Ritzy Misfit,
and can be purchased through her shop.

Each piece is so unique... I love them!
Go check these people out
and show them some love
by buying their stuff...
in fact, buy two!
Then you can keep one and pass the other on...
and the circle of love continues.


Saturday, December 24, 2011

Wishing you...

many blessings throughout this hope-filled season
and many more to come in the new year.


Thursday, December 22, 2011

Joy To The World... indeed!

So, what do you think happens 
when two people
who both like to blog,
who both LOVE diy crafting,
and who both laugh a lot
get together?

Well, quite honestly... 
nothing really THAT productive.
Okay, okay, that's not completely true.
Let me first give some background here:

Over the Summer,
Lori, from head above water, and I
met each other...
in a dark movie theater.
We weren't there to meet each other.
We were there to hang out 
with our mutual friends.
However, as the evening went on,
we found ourselves 
laughing, no,
BUSTING a gut
at all the same parts;
weeping over all the same scenes;
and then afterwards figuring out
that neither one of us are too keen on 
getting/giving physical affection
to anyone and everyone!
As you can read for yourself,
we were meant to be.

Here's the sad part...
we don't live in the same town.
So, we knew going into this that
our meetings would be few and far between.
But, we went for it!

Fortunately, 
her parents live in my town
so she visits every so often.
At the beginning of December,
we decided to have our first 
craft day.
My husband and her sister both
questioned what exactly was going on.
Please... just don't try to understand.

Lori's mom watched her boys for her;
I put each of my little Loves down for a rest;
and we began!

Each of us had a project.
I had pinned something that I was very eager to do.
However, I REALLY should have done
some prep work.
All I wanted to do was stencil the words,
"Joy to the world"
on a map.
Rather than buying stencils,
I decided to do it myself and make a stencil...
because that's what I do.
Um... in the THREE hours that we spent together,
I managed to get TWO letters cut out.
Of course, there were a lot of factors:
kids getting up;
looking through fonts;
kids getting up;
more fonts;
other kids getting up;
oh yes, and laughing... a lot.
So, two weeks later,
here's what I FINALLY accomplished:

And I love it.

Lori was working on a great project and 
actually accomplished something while 
being in my home.
She had come across some of her grandfather's ties, 
bought some cute buttons,
no-sew glue,
and made bracelets for her and each of her sisters.
Isn't that SUCH a great idea??
I love it.
So, now each of them have a little something
to remind them of their grandpa.


Prepare yourselves.
Who knows what Lori and I will do next?!?!