Showing posts with label DIY. Show all posts

Monday, February 4, 2013

The Daily DIY: Mercury Glass


You'll need:
Krylon Looking Glass Spray Paint
Vinegar
Any Glass Jar


Music: Generator^First Floor by Freelance Whales


Depending on how thick you spray the paint on and how much vinegar you let sit, will decipher what look you end up with. I like the way this turned out because it looks a bit aged now, but it's subtle.


This is such an easy way to add a little "antique" to your decor even if you don't have the real thing.
Have a lovely day!

Friday, December 14, 2012

The Daily DIY: Hanging Paper Lanterns


These Hanging Paper Lanterns are SUPER easy to make and are so pretty to look at.
Here's a short video tutorial to show just HOW easy.


music: "Oh Holiday" by Jules Larson

I used a translucent thread to hang these from our ceiling. You could also set these over mason jars with tea lights to create an actual lantern effect. I'm excited to incorporate these into the little ladies room decor... as they are much like me and enjoy having pretty things to look at all around them. 

Have a lovely, wonderful weekend!


Tuesday, August 7, 2012

The Daily DIY: Instagram + Washi Tape Calendar


I love Instagram {@sheislaughing}. I love having my camera with me, but honestly with three littles hanging on me, jumping on me, and wanting me to hold them, my phone just has to be able to do the trick most of the time when we're out and about.

I received this Instagram Calendar as one of the gifts from the Handmade Gift Swap that I did last year. I've had several ideas of how to display it, but nothing really came about, until... 

I was picking things up around the house and looked over and saw the calendar sitting near my Washi Tape (um, yep, you guessed it... The Plaid Barn) and had the brilliantly simple idea to just tape each month together and then hang it on the wall (I used the Command adhesive strips).

I love it. It hangs perfectly on the wall in the room off of our kitchen, so I see it all the time. And I smile every time I see it.

You can make your own Instagram art here (there are so many options!), and get some pretty Washi Tape here (as well as lots of other awesome crafty supplies!). This was a great gift, and now I can't wait to make my own personalized Instagram art. And Washi Tape may be my new addiction.

Monday, July 30, 2012

"I Made That Monday!": A Productive Week


I found myself in project mode last week.

Two pillowcase dresses for two little ladies.
These are not actually pillowcases, but SO simple to create.
I have STACKS of fabric pleading to become
the wears of the tiny fashionistas around here.
I may even get really crazy and make myself one.

A leather flower.
Oooh, this has been a dream in my mind since I began creating these hair pins,
and I have to say that this one is my favorite yet.
That mustard color and those white vintage gems together make me smile...
every time I look at it.

Arm Candy.
I had seen a wrap bracelet in a local shop here and SWOONED over it.
It was so incredibly beautiful.
It was also $40.
I could not spend $40 on a bracelet.
Fortunately, a few weeks later,
some fellow crafters and I worked our magic little fingers to the bone
to create our own.
I BEGAN the bracelet one evening,
worked on it for a good hour and a half to two hours,
and finished it a few days later after spending at least another two hours on it
(Granted, I am a perfectionist.).
That wrap bracelet I saw in the local shop here...
worth every single penny.

Custom Canvas Art.
This is so simple, 
and such an easy way to create words throughout your home.
I had originally seen it done here,
and then began seeing it all over Pinterest.
The original one I saw is actually a Paint-By-Number painting picked up at a thrift shop,
with Vinyl lettering placed together to make the quote and then painted white.
Mine is actually a canvas,
painted with colors that I chose,
Vinyl lettering over that to create the quote
and then spray painted with a glossy white paint.
Let the paint dry for the afternoon, or overnight,
and then peel away the letters.
My Love created a video of our life together put to the music of "Stand By Me";
this will hang in our room.
I may be going overboard with these soon.

Also, plans have begun for the 2012 Fall Red Barn Outdoor Market.
The musicians are lined up;
The food Vendors are tweeking menus;
and the Vendors are registering and preparing.
If you are local, come!
(and even if you're not... ahem... Becky! It's worth a little weekend trip.)
It is magical.

Get creative today!


Monday, July 16, 2012

"I Made That!" Monday: Rose Cabochon Pendants


Let me fill you all in on something...
Each morning I wake up to some crazy little munchkin people running into my room;
they cuddle and snuggle and jump and finally realize that they are ready for breakfast
and just start saying over and over, 
"I'm ready for breakfast, I'm ready for breakfast...".
So we're up and at em' pretty quick getting breakfasts made and bellies filled.
However,
in the time that they are cuddling and snuggling and jumping,
I am usually checking emails...
looking for one very special,
very exciting email...
each morning.

It's my daily deal from The Plaid Barn.
The Plaid Barn is a website that offers you an
AMAZING DEAL
on some kind of craft supply or DIY kit each day
at FRACTIONS of their normal costs...
seriously like up to 90% sometimes!
For someone who LOVES a deal
AND
has an addictive personality...
well, you can just imagine.

These were actually two different daily deals:
(which also came with an epoxy cover...
the girls and I have already made some Mod Podged pendants and used those...
and they are CUTE!)
and
the Tiny, Petite Rose Cabochons.

I saw these sitting together one day and decided they would combine
and be the perfect little afternoon project for me.
I painted a few of the pendants,
but loved the look of the wood for some of them.
Then I just glued the little cabochons on,
and the connector for the chain,
and voila!
And I still have some left over...
so some sisters may be getting some treats soon,
we'll see.

Be lovely today!!


Monday, June 18, 2012

"I Made That!" Monday: diy Summer Day Teepee


My littles are always looking for a cozy little place to hide away in,
and making some little teepee's has been on my never ending  project list for awhile.

I chose THE most simple way to do this
and used stuff that we already had,
so this was a great afternoon project.

You'll need:

Four sticks similar in height
(at whatever height you'd like the teepee to be)

A Full or Queen Size Sheet

Rope or Twine

Scissors 


Begin by setting the sticks up creating a pyramid;
then take the rope or twine and begin looping it through every other stick.
I reinforced it by looping it completely around one stick and 
then looping it a few times in the opposite direction as well.
Knot the two ends together a couple times.


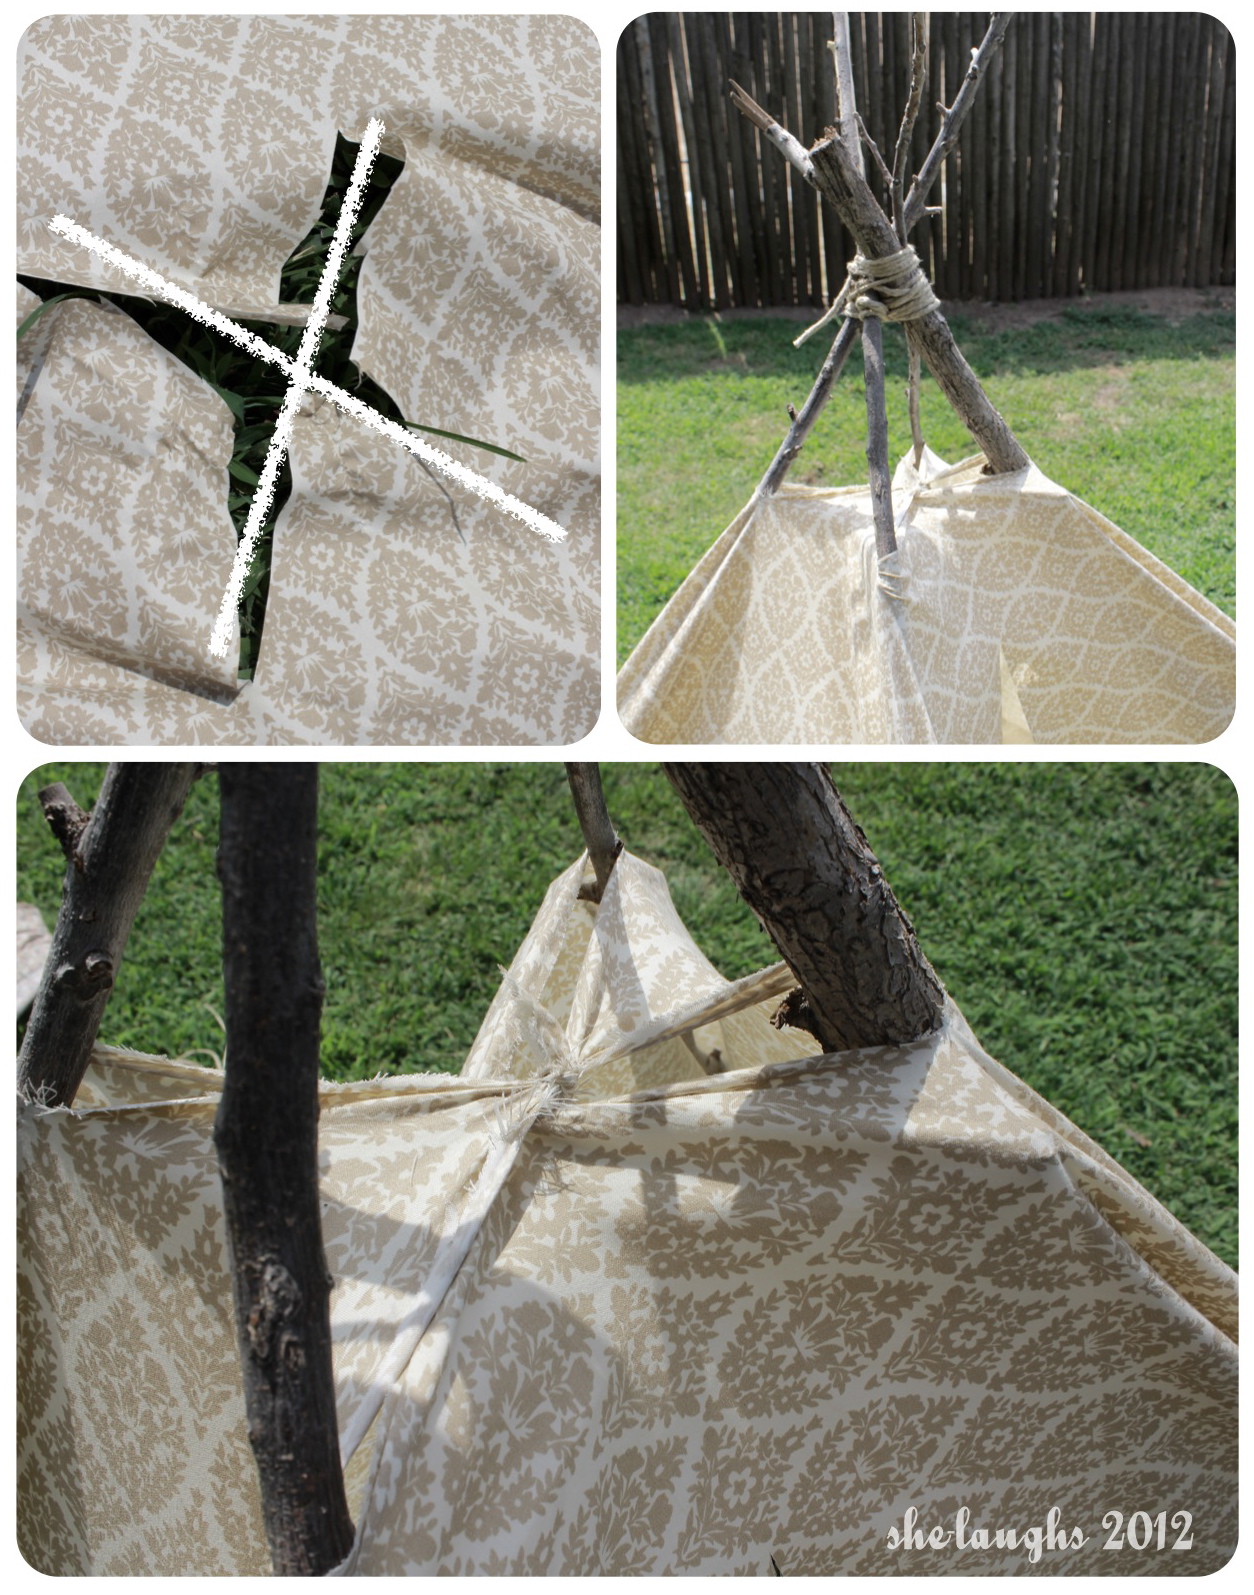
Cut an 'X' in the middle of the sheet
and then drape over the sticks,
pulling the sticks through the 'X'.

I tied each opposite triangle (from the 'X' cut through the middle) to each other 
to keep the sheet from slipping at the top,
and also knotted the ends to the bottom of each stick.


I cut a straight line up one of the sides for an entrance
and knotted the ends together to keep it open.

Add some blankets, pillows, and books
and you have the perfect little Summer day teepee.


Wednesday, June 13, 2012

The Daily DIY: Block Printed Tea Towels

These tea towels are fun and simple to make
and allow your creativity to take over
for each custom design.


Begin by finding a linen-like fabric to use.
I chose this one from Joanne's
(it's 50% through June 23rd for all you fabric bargain-hunters!).
Cut it to the width you prefer.

Out of three yards, 
I ended up with eight 2 x 2 1/2 foot squares.

I used some foam stamps that I had on-hand,
and some Frog Tape to create some lines,
 get creative though,
 and use any kind of interesting object you can find.


Once the fabric is cut, 
and the design is thought out,
use the foam pouncers to cover your objects with paint and 
then stamp them onto the fabric.
If making lines, 
use two pieces of tape parallel to each other with the width of space
you'd like the line to be
and then use the foam pouncer to paint the space between the tape.
Allow paint to dry and remove tape.

Stitch a hem around the towel and wash before using to set the paint.

This is a great DIY project to create custom gifts
for weddings, hostess gifts, or new home open houses.

Get creative and have some fun!