Showing posts with label Pinterest Projects. Show all posts

Monday, July 30, 2012

"I Made That Monday!": A Productive Week


I found myself in project mode last week.

Two pillowcase dresses for two little ladies.
These are not actually pillowcases, but SO simple to create.
I have STACKS of fabric pleading to become
the wears of the tiny fashionistas around here.
I may even get really crazy and make myself one.

A leather flower.
Oooh, this has been a dream in my mind since I began creating these hair pins,
and I have to say that this one is my favorite yet.
That mustard color and those white vintage gems together make me smile...
every time I look at it.

Arm Candy.
I had seen a wrap bracelet in a local shop here and SWOONED over it.
It was so incredibly beautiful.
It was also $40.
I could not spend $40 on a bracelet.
Fortunately, a few weeks later,
some fellow crafters and I worked our magic little fingers to the bone
to create our own.
I BEGAN the bracelet one evening,
worked on it for a good hour and a half to two hours,
and finished it a few days later after spending at least another two hours on it
(Granted, I am a perfectionist.).
That wrap bracelet I saw in the local shop here...
worth every single penny.

Custom Canvas Art.
This is so simple, 
and such an easy way to create words throughout your home.
I had originally seen it done here,
and then began seeing it all over Pinterest.
The original one I saw is actually a Paint-By-Number painting picked up at a thrift shop,
with Vinyl lettering placed together to make the quote and then painted white.
Mine is actually a canvas,
painted with colors that I chose,
Vinyl lettering over that to create the quote
and then spray painted with a glossy white paint.
Let the paint dry for the afternoon, or overnight,
and then peel away the letters.
My Love created a video of our life together put to the music of "Stand By Me";
this will hang in our room.
I may be going overboard with these soon.

Also, plans have begun for the 2012 Fall Red Barn Outdoor Market.
The musicians are lined up;
The food Vendors are tweeking menus;
and the Vendors are registering and preparing.
If you are local, come!
(and even if you're not... ahem... Becky! It's worth a little weekend trip.)
It is magical.

Get creative today!


Monday, June 18, 2012

"I Made That!" Monday: diy Summer Day Teepee


My littles are always looking for a cozy little place to hide away in,
and making some little teepee's has been on my never ending  project list for awhile.

I chose THE most simple way to do this
and used stuff that we already had,
so this was a great afternoon project.

You'll need:

Four sticks similar in height
(at whatever height you'd like the teepee to be)

A Full or Queen Size Sheet

Rope or Twine

Scissors 


Begin by setting the sticks up creating a pyramid;
then take the rope or twine and begin looping it through every other stick.
I reinforced it by looping it completely around one stick and 
then looping it a few times in the opposite direction as well.
Knot the two ends together a couple times.


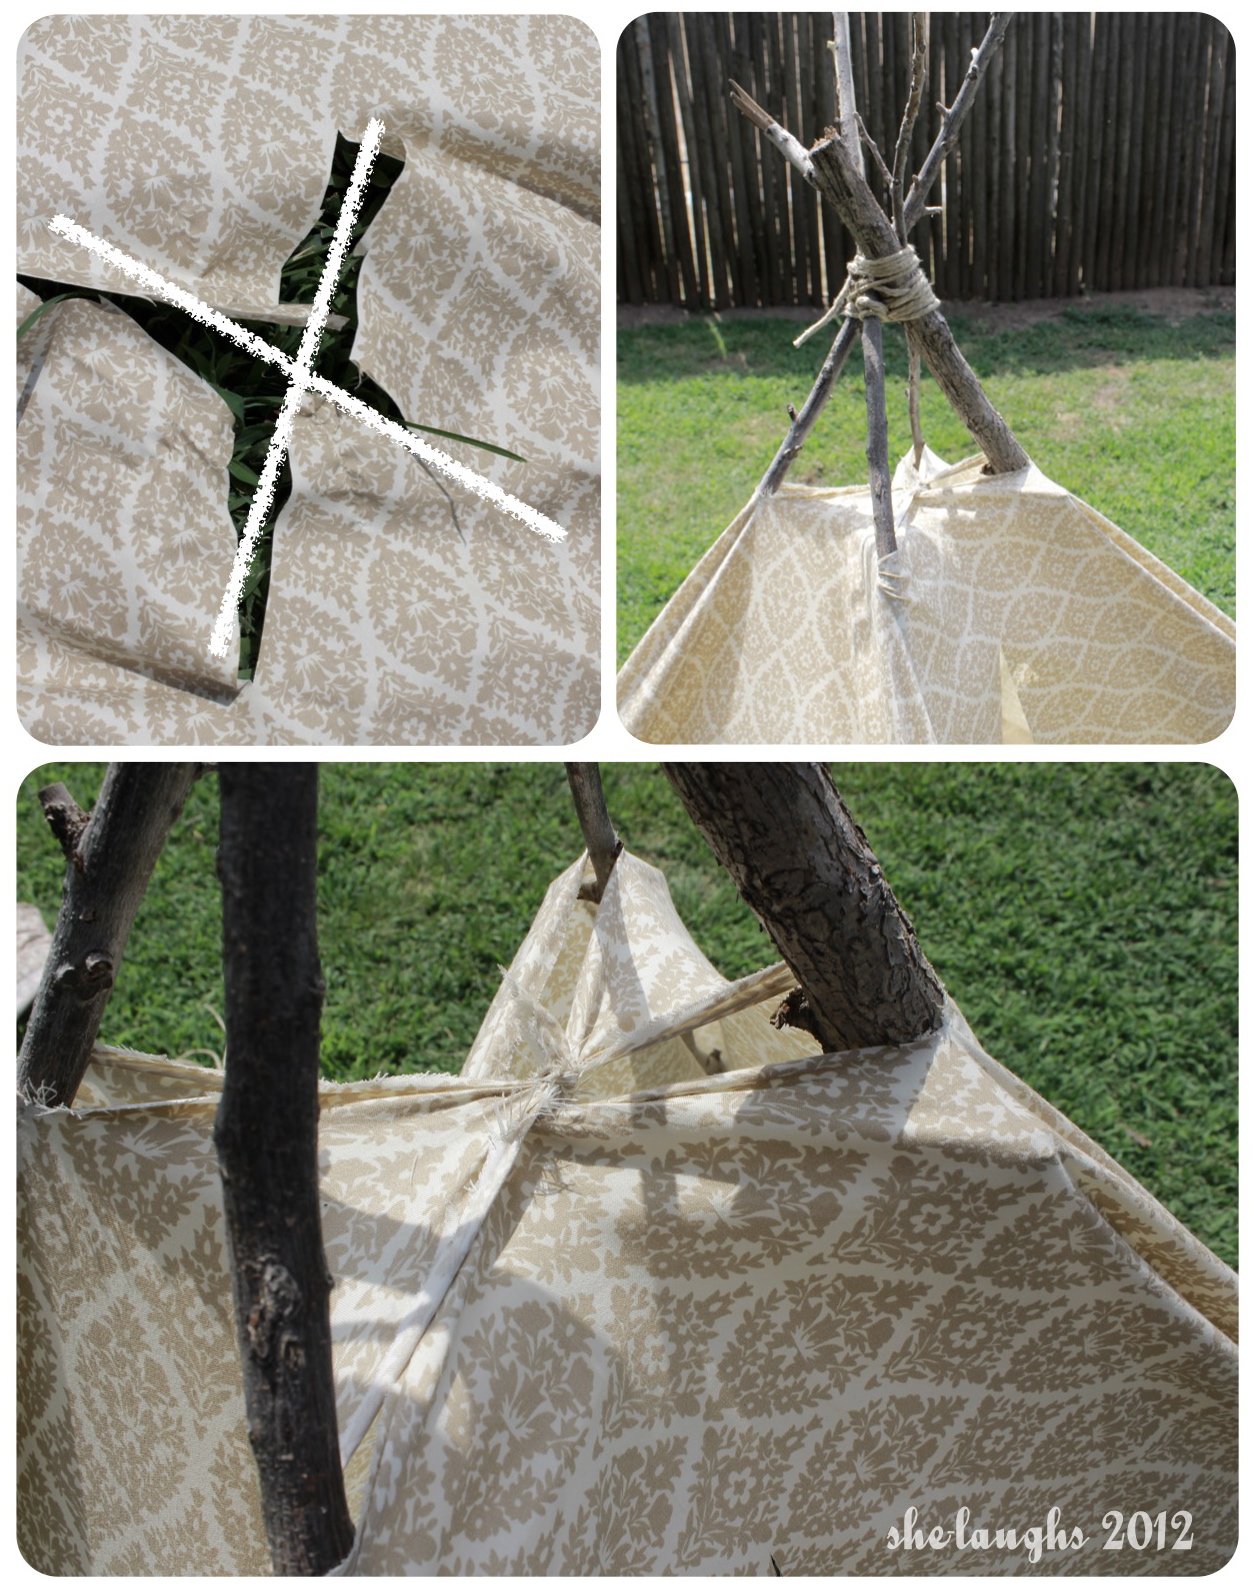
Cut an 'X' in the middle of the sheet
and then drape over the sticks,
pulling the sticks through the 'X'.

I tied each opposite triangle (from the 'X' cut through the middle) to each other 
to keep the sheet from slipping at the top,
and also knotted the ends to the bottom of each stick.


I cut a straight line up one of the sides for an entrance
and knotted the ends together to keep it open.

Add some blankets, pillows, and books
and you have the perfect little Summer day teepee.


Wednesday, June 13, 2012

The Daily DIY: Block Printed Tea Towels

These tea towels are fun and simple to make
and allow your creativity to take over
for each custom design.


Begin by finding a linen-like fabric to use.
I chose this one from Joanne's
(it's 50% through June 23rd for all you fabric bargain-hunters!).
Cut it to the width you prefer.

Out of three yards, 
I ended up with eight 2 x 2 1/2 foot squares.

I used some foam stamps that I had on-hand,
and some Frog Tape to create some lines,
 get creative though,
 and use any kind of interesting object you can find.


Once the fabric is cut, 
and the design is thought out,
use the foam pouncers to cover your objects with paint and 
then stamp them onto the fabric.
If making lines, 
use two pieces of tape parallel to each other with the width of space
you'd like the line to be
and then use the foam pouncer to paint the space between the tape.
Allow paint to dry and remove tape.

Stitch a hem around the towel and wash before using to set the paint.

This is a great DIY project to create custom gifts
for weddings, hostess gifts, or new home open houses.

Get creative and have some fun!


Wednesday, March 21, 2012

The Daily DIY: Bird's Nest Pendant

I saw this on a blog the other night and pinned it right away
knowing that the little ladies and I would love this project
(since that first sighting, I'm seeing them everywhere now!).
It's pretty simple and takes less than 30 minutes to make...
even with little helpers wanting to do everything themselves.

Here's what you'll need:

Jewelry wire (ours is Vintage natural brass)
Beads (whatever color you'd like your eggs to be)

Note:
I kept the wire attached to the spindle and began in the middle
since I had no idea how much wire I would need.
I would suggest a length of 24 to 36 inches.

Begin by sticking your wire through one bead and wrapping through once more;
do this again with each bead.
Once wrapped through, stick the wire through all three beads forming a triangle.
From here, wrap the wire around and in and out of the beads
beginning to form a little nest.

From here, take one side of the wire and form a loop 
and then secure by wrapping around the formed nest and twisting several times.
Continue wrapping in and out of the nest;
secure end piece by wrapping or twisting.

And TADA! 
The end results should look something like this.
We have some pretty vintage fabric that we're going make a 
little necklace out of.

A perfect little accessory for Spring!

Friday, March 9, 2012

Lace Fever

First...
A little sneak peek at what I've been working on this week.
If you can be in love with a curtain,
I am.

A few weeks ago,
some lady friends and I were working on these:


It's a jar
wrapped in lace and twine.
Seriously.
Find a jar,
get some lace,
hot glue the ends together,
and wrap some twine around it.
It can't get any easier
or more lovely.

They just add prettiness to the room.
I find myself wanting to don a petticoat and parasol
when I see them.
THAT'S how pretty they are.

Have a very lovely weekend!

Friday, February 10, 2012

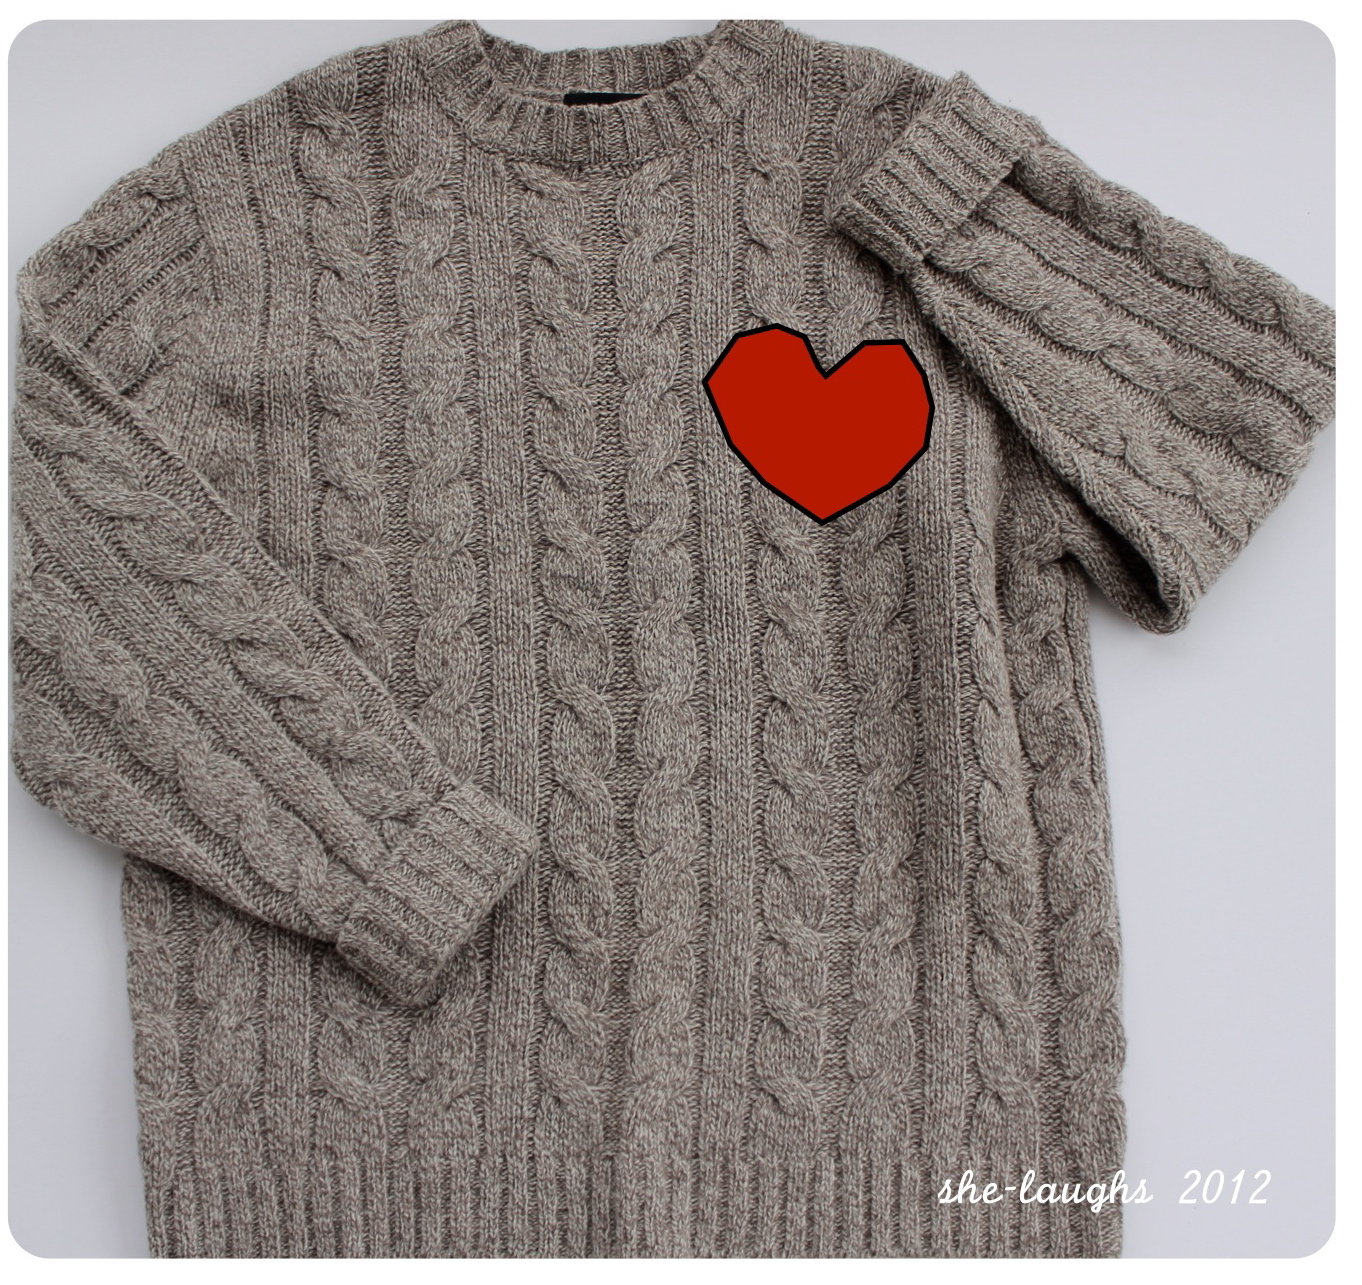
Hearts.

This...


may be looking something more like this...

really soon.

I've been seeing heart patches everywhere
and I must say I love them.
Big hearts on your front,
tiny heart patches on your elbows,
oh, yes, please.

So, we'll see.

Thursday, January 19, 2012

Old Faithful and The New Gal

Have I mentioned lately how much I love having sisters?
Let me just put this into perspective here:
I grew up with two younger brothers
and lived with my dad from 14 on.
Yeah, me and three boys.
I married the oldest of five boys...
five very BOYISH boys.
I love boys
(especially the snuggly little piece of roundness
who looks like a baby version of his daddy!).
I love brothers,
I mean LOVE them...
like I can tear up just thinking about 
HOW MUCH I love them kind of love.
But then sisters started coming along,
and a whole other world was before me.

I also REALLY love having my sisters on Pinterest.

So, a few months back I pinned this camera bag:

{via}

Isn't it so beautiful?

Yes, it is.
It's also $309.00...
slightly over what I'm willing to pay for a camera bag,
just slightly.
Oh my, but it IS beautiful.
I'd look at it every so often and just smile,
having come to terms that we would never be together.

And then it was my birthday.
At my in-laws house, we have birthday dinners
(birthday person gets to pick the meal, dessert, 
the birthday table cloth is put on the table,
everyone sings and it's a jolly good time)
and then we get to open our gift.

No one had asked for any suggestions this year
(which I was actually ecstatic about because I 
LOVE surprise gifts!)
so I was looking forward to seeing what they had come up with.
Oh mercy! They did not disappoint.


apparently searched high and low
and finally when the hopes of finding 
THE PERFECT MATCH
were almost gone,
my brother spotted this
(and it was on CLEARANCE!!).
My sister then MADE the form inside.
It is amazing.
AMAZING.

Check out her blog for the full tutorial.

The strap that came on it was just a tad thin
so I added Old Faithful,
who has been gracing my shoulder 
since my very first 35mm.

Aren't they such a lovely couple?


Thursday, December 22, 2011

Joy To The World... indeed!

So, what do you think happens 
when two people
who both like to blog,
who both LOVE diy crafting,
and who both laugh a lot
get together?

Well, quite honestly... 
nothing really THAT productive.
Okay, okay, that's not completely true.
Let me first give some background here:

Over the Summer,
Lori, from head above water, and I
met each other...
in a dark movie theater.
We weren't there to meet each other.
We were there to hang out 
with our mutual friends.
However, as the evening went on,
we found ourselves 
laughing, no,
BUSTING a gut
at all the same parts;
weeping over all the same scenes;
and then afterwards figuring out
that neither one of us are too keen on 
getting/giving physical affection
to anyone and everyone!
As you can read for yourself,
we were meant to be.

Here's the sad part...
we don't live in the same town.
So, we knew going into this that
our meetings would be few and far between.
But, we went for it!

Fortunately, 
her parents live in my town
so she visits every so often.
At the beginning of December,
we decided to have our first 
craft day.
My husband and her sister both
questioned what exactly was going on.
Please... just don't try to understand.

Lori's mom watched her boys for her;
I put each of my little Loves down for a rest;
and we began!

Each of us had a project.
I had pinned something that I was very eager to do.
However, I REALLY should have done
some prep work.
All I wanted to do was stencil the words,
"Joy to the world"
on a map.
Rather than buying stencils,
I decided to do it myself and make a stencil...
because that's what I do.
Um... in the THREE hours that we spent together,
I managed to get TWO letters cut out.
Of course, there were a lot of factors:
kids getting up;
looking through fonts;
kids getting up;
more fonts;
other kids getting up;
oh yes, and laughing... a lot.
So, two weeks later,
here's what I FINALLY accomplished:

And I love it.

Lori was working on a great project and 
actually accomplished something while 
being in my home.
She had come across some of her grandfather's ties, 
bought some cute buttons,
no-sew glue,
and made bracelets for her and each of her sisters.
Isn't that SUCH a great idea??
I love it.
So, now each of them have a little something
to remind them of their grandpa.


Prepare yourselves.
Who knows what Lori and I will do next?!?!


Wednesday, November 16, 2011

Loving this...

I have been waiting for the day that I step out my door and gaze upon this.
The jeweled colors of Autumn have arrived here.
And it kind of gives me a little extra skip in my step.

I actually have a lot on my mind right now...
which is NEVER good for me to combine with blogging.
So, I'm keeping this short...
but delicious!

This last weekend provided the opportunity for a great photo session; 
the images are still in editing,
but should be up soon.

I also had the opportunity to throw an 
open house of sorts 
for one of my brother-in-law's and his fiance
who will soon be united in wedded bliss 
forever and ever.
I can't wait.
And it was a great time to see some family friends
who we just don't see as often these days.
So, here's the delicious part of this post:


The recipes for the spread of food were provided 
from none other than,
yep, Pinterest.
(By the way, my Pinterest is whacked right now!
Anyone else experiencing this??
And now of course since I just typed this,
I checked it out and it's working fine.
Ah! Pinterest!!!)

This crumb cake is so good. SO GOOD.
As I was checking this recipe out,
I stumbled upon the Pumpkin Pie Snickerdoodles.
Needless to say, 
I'm now following a new blog...
because I want to eat everything I saw.
However, the Peanut Butter Chocolate Bars were...
um, OUT OF THIS WORLD AMAZING.
And so easy to make...
seriously, melt some stuff and set it aside.
All in all our bellies were full of some 
pretty tasty treats.

Also, I just feel like mentioning that
I am SO incredibly grateful for the mate
my little punk bro-in-law has found himself.
All my brothers have provided me with 
incredible sisters...
and I'm not just writing that because 
I know they all read this.
I mean it should definitely earn me some points,
but I DO genuinely mean it when I say
that I have been extremely blessed by each of them.
(In fact, I somehow managed to wrangle one 
of them into helping me 
paint my living room this week!
I've only had the paint since February!!
hehehe AND I might even get a Spangles Pepsi
out of it because she's now hooked as well!
Pictures to come!)
Anyway, to learn more about the newest sis
go look at her blog...
unless you don't like things that are awesome,
because it's basically awesome at it's greatest.

So much for keeping it short!


Tuesday, August 23, 2011

Pinterest Projects aka You Win Some, You Lose Some


Ah, Pinterest... my carpal-tunneled wrists hate you, but I love you so SO much. Pinterest is a great resource for one who is looking for some inspiration overload.  
I pinned this Doily Lamp and knew exactly where I wanted it in my home.  I set out on my mission to find the perfect doilies for this project, and I found a lot... a lot of expensive doilies nestled in vintage dresser drawers found in the nooks of wonderous Antique shops.
I wasn't wanting to spend a lot on this project, so I decided to mull it over in my mind while I went and looked at some fabric, because looking at fabric solves most all my problems in life.
I was at a little shop near my home, with the doilies set aside in the back of my mind not on the fabric forefront, when all of a sudden... I FOUND THE PERFECT DOILIES!
They were in a plastic bag on the scrap table calling out to me,
"Nicole, we are the chosen ones; take us, use us, make us yours."
So, I snatched them up and paid the $12 price tag, looking over my shoulder wondering if anyone else even knew of the treasures that the scrap table held. Since I was the only one in the store, I assumed they didn't and skipped out the door with delight.
Fast forward one week later (yeah, I don't know how I waited a week to complete this!), my super-cute-pregnant-with-her-first-baby sis-in-law is over (while our husbands and a few other hooligans were out pokering it up in the garage...), and it's the perfect time to do a project.
I thought I could make this project a bit easier and just starch the doilies... uh, no. The starch did not work at all. And so, at 11 o'clock at night, after we had already had numerous fits of laughter, we decided to follow the directions and use paper mache´. So easy, so quick. 
(Two cups of flour, two cups of water, one tablespoon of salt... mix together, paper mache´around a blown up balloon.)
My sis then asked if I wanted her to use my blow dryer to help the drying process, which of course I was all for. A few minutes into it, the balloon that the doilies were paper mache´d onto BURST... in my sister's face... HAHAHAHAHAHAHAHAHAHAHAHAHAHA. 
Oh my goodness, that line of "HAHA's" doesn't even begin to describe the hysterical laughter that took place. It was so funny.
We got ourselves together and quickly blew up another balloon and got paper macheĆ­ng and thought it best to just let it hang dry overnight. It wasn't quite dry in the morning so I set it outside for a few hours and it dried up perfectly. I sprayed it with a coat of paint (it was really pretty unpainted, but if you looked close you could see the residue from the paper mache´, and now it matches some of the other treasures in the room) and hung it.
Oooooh, and it is beautiful! I really love how it turned out.
(I also only did a semi-circle around the balloon rather than the full circle so that it could hang more easily from the ceiling.)
So, this project is a WIN.

This project, however was not.


I pinned this Homemade Air Freshener and decided to change some things up. I have an abundance of herbs, so I decided to use my Rosemary and Lemon Verbena rather than purchase these oils, and steep the herbs and then use that water in the recipe. I did purchase some Sweet Orange oil and used it with both herbs. I feel like if I tweek this some more, it will work eventually, but this round it did not.  It's a gelatin mix and for some reason, these just didn't gel completely.  I have a feeling it has something to do with when I  added the oil. They do still smell good and look pretty... so I guess it's not a total loss, but definitely needs some work!